Sunday, March 17, 2013

General Crochet Flower Pattern

Alright so here is the pattern for the flower I use for pretty much any of my patterns.  I've tried several flower patterns and am never fully satisfied with them and I always end up coming back to this one.  It is made in two different parts to give a fuller look, or to provide the option of two colors.

Flower Base:

Ch 5, sl st to 1st ch
16 hdc in circle, sl st to first hdc
Ch 3, sk st, sl st next st, repeat 7 times (This creates 8 loops)
*Sl st in first loop, hdc, 4 dc, hdc (all in same loop) repeat from * in each loop around
Sl st to first st and tie off

Your base should look like this:


Flower:
Ch 45, sc in 6th ch from hook, *ch 2, sk next 2 chains, sc nx ch, repeat from * to end. Turn
hdc, 4 dc, hdc in each loop to the end
Tie off (leave about 12 in to sew)

Take the loose strand and weave into loops of flower going in each loop from the same direction.  Tighten the string to bunch the flower.  Sew onto the flower base or onto your item.

Your flower should look like this:


When you add the flower to your base it will look like this if you use one color:


This is what a flower looks like with a different color base:


You can see more examples of the two color contrast in my "Flower Headband" post.


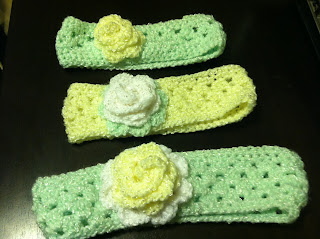
Granny Style Flower Headband


These cute little headbands have become my go to headband pattern, they are cute and I can have one made and put together in an hour. 

You can find the pattern at the following link: Granny Style Flower Headband Pattern

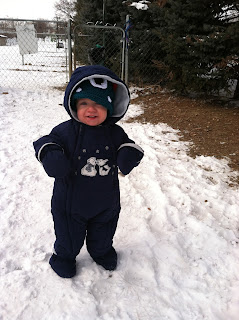
This pattern without adjustments makes a headband that will fit a toddler, like 18+ months, I tried it on my son who is 22 months and it fits nicely.  For smaller sizes decrease your chain according to the suggestions given on the website.  If you are making this for a baby go to this website for a size chart.
This is an extremely helpful website when you are adjusting any pattern to fit a younger or older baby.  The site provides various measurements (feet, head, chest, etc.) to help guide you in  your decreases or increasing endeavors.

You can use the flower pattern given on the website or you can use my flower pattern I have created, which will be featured in a future blog which can be found here: Flower Pattern

Flower Baby Sandals


So I made these and while I think they are cute I am not crazy about the colors I did.  It was just what I had at the time.  I think I would be crazy about these little sandals if they were in some different colors.

The pattern can be found at this link: Flower Baby Sandals Pattern

Baby Girl Slippers/Headband Combo


Ok so I absolutely LOVE how these turned out.  I started with the slippers to match an adorable outfit (pictured above) we got for Kaia.  After I finished the slippers I realized she had to have a matching headpiece.  I absolutely love how well they turned out.

For the pattern for the slippers see the Ballet Slipper Pattern I posted in an earlier blog.

For the headband pattern go to the following link: Ribbon Headband

Here is the pattern for the bow used on the slippers:

Ch 7, turn
hdc 2nd rom hook and continue across
Ch 1, turn, hdc in nx 2 sts, ch 2, skip 2 sts, hdc nx 2 sts
Ch 1, sc around (3 in each corner)
Tie off (leave a long tail)

When you tie off use the long tail to wrap around the center of the bow to bunch it up.  Then sew the bow to the slipper.

(You might be wondering why I did the ch 2 and sk 2 sts in the middle of the bow.  The original pattern had that whole row as hdc.  I however find that by omitting these 2 stitches and leaving a small hole allows the bow to be a little more flexible when you bunch the middle together and makes for a nicer looking bow.)

Baby Brimmed Hat


I just LOVE how cute this little hat turned out I was a little skeptical at first but once I added the purple stitching and bow it really came together.  I imagine this would be just as adorable for a boy if you left off the bow, or maybe put a button in place of the bow.

You can find this pattern at the following link: Baby Brimmed Hat

Baby Boy Beanie

Yet another simple pattern for a baby boy, but could just as easily work in girls colors.  I was asked to make these for someone who recently had a baby and needed some hats that were a little smaller than her newborn hats.  For my craft show I will make several of these in boy colors and several of the Bobble Hat in girl patterns.

Baby Boy Beanie Pattern:

Using an I hook

Make a Magic Ring, 12 dc into ring

Row 1: ch 2, 2 dc in each dc around, sl st in first dc

Row 2: ch 2, *1 dc in first dc, 2 dc in next, repeat from * around, sl st in first dc

Row 3-8: ch 2, 1 dc in each dc around, sl st in first dc

Row 9-13: ch 1, *fpdc (front post dc) in first to dcs, bpdc (back post dc) in next 2 dcs, repeat from * around, sl st in first fpdc

Baby Bobbles Hat


I love this hat, I was looking for a simple yet appealing baby hat to make.  I love this bobble pattern, it's adorable plain with no additions but would also be adorable with an added flower or bow.  I think this will be a winning pattern I use often for newborn hats.

I found this pattern at the following link: Baby Bobbles Hat Pattern

Flower Headband


I love this pattern, the headband is so cute and stylish.  I recently made 15 of the above blue, yellow and white one for my high school alma mater Cheerleading squad (Go Wardens!)  I love how they turned out.  The original pattern I used had a tie method for securing it and another was to add a button loop that extended off the headband.  I adapted the pattern and made two button holes as a part of the headband making it adjustable to fit each individual.  As you can see there are endless possibilities for color combinations with this pattern.

Here is the link for the pattern I used: Crochet Headband Pattern
(You can find the pattern for the flowers I use in an upcoming post here: Flower Pattern. I use the same flower pattern for just about all my projects, they are quick and simple, yet look nice and full.)

However here is the whole adapted pattern I created using the above link with added button holes:


Introduction

This headband can be made in a fairly short amount of time with less than 1 ½ ounces of yarn. The ties allow it to be adjustable to different size heads, as well as reduce the bulky feel. The possibilities to customize it are endless!

Materials List

1 ½ oz (40 g) any worsted weight yarn
4.25 mm hook
Yarn needle

Finished Size

approx 3 inches wide before edging; approx 17 inches not including ties

Gauge

Approx. 4 stitches per inch

Approx. 4 rows per inch

Notes

This looks nice with a variegated yarn. Any stitch could be used to vary the look. When determining the exact size of your headband, take into account whether your chosen stitch has much stretch or not.

The Pattern

Pattern:

Ch 4

Row 1: sc in 2nd ch and across, ch 1, turn

Row 2: (2 sc) in 1st st, sc 1, (2 sc) in last ch, ch 1, turn

Row 3: sc across, ch 1, turn

Row 4: (2 sc) in 1st st, sc to next to last st, (2 sc) in last st, ch 1, turn

Repeat Rows 3 and 4 until you have 13 stitches. Work one row of plain sc, ch 1, turn. Now you are ready to begin your pattern. Feel free to insert any stitch pattern.

Pattern Row: dc in first stitch, *skip 1 stitch, work (sc, dc) in next stitch; repeat from * until there are two stitches remaining. skip 1 stitch, sc in the turning chain of the previous row, ch 1, turn

Work your pattern until it reaches approximately 12 inches from the start of your pattern (do not count the sc). See notes section about different stitches. If your stitch stretches a lot (like sc rib), you may want to work less than 12 inches. If your stitch doesn’t stretch much, you may want more, depending on the size of your head. The examples stretch some, so I made the pattern section 12 inches. (12 inches seemed way to small for me so I added quite a bit more I just did it until it fit comfortably around my head which ends up being about 15-16 inches of the pattern section)

When you finish your pattern stitches, continue:

Row 1 (of decresases): Sc dec 2 st, sc to last 2 st, sc dec, ch 1, turn (11 sts)

Row 2: sc across, ch 1, turn (11 sts)

Row 3 (of decresases): Sc dec 2 st, sc next 2 sts, ch 3, skip 3 sts, sc next 2 sts, sc dec, ch 1, turn (9 sts) (The ch 3 will create your first button hole)

Row 4: sc across, ch 1, turn (9 sts)

Row 5 (of decresases): Sc dec 2 st, sc to last 2 st, sc dec, ch 1, turn (7 sts)

Row 6: sc across, ch 1, turn (7 sts)

Row 7 (of decresases): Sc dec 2 st, ch 3, skip 3 sts, sc dec, ch 1, turn (5 sts)

Row 8: sc across, ch 1, turn (5 sts)

Row 9 (of decresases): Sc dec 2 st, sc next st, sc dec, ch 1, turn

Row 10: sc across, ch 1, turn

Now you are ready to do the sc border and ties. READ THE ENTIRE NEXT SECTION BEFORE YOU BEGIN.

Ch 1, sc around the headband. Sc 3 in corners. When you get back to where you started, join to the first sc with a slip stitch. You may want to ss once more for extra stability. Fasten off and weave in ends.  Sew on button.


Brobee Hat (Yo Gabba Gabba)


Kyler is a huge Yo Gabba Gabba fan so after making the Monster hat I thought, hey I could use the basic pattern and make a Brobee hat for him.  I also made a matching hat for Kyler's cousin who is also a big fan. 
 
Because this is a trademark I cannot make this pattern and sell it but feel free to make it yourself. 
 
 
I used the following for the hat and spikes: Monster Hat
(When you get to the ear flaps simply alternate each row between the light and dark green.  Use the light and dark green for teh braids.)
 
Unibrow:
Black yarn
 
Ch. 24
R1: SC 2nd from ch SC across sl st last stitch
Tie off
 
Mouth:
Red yarn
Black Yarn
 
Starting with the black yarn, Ch 20
SC in 2nd ch and each across
Switch to red, 3 sc in same st. SC in each st working around (Do not turn)
4 SC in 1st st, sl st to first SC, finish off
 
Eye:
White yarn
 
Ch 5
SC 2nd from chain and across
3 SC in last st
Rotate (Do not turn) SC across, 3 SC last st, sl st to first SC
SC around, at curve inc. by 3 (2 SC in first st, SC nx st, 2 SC nx st)
Continue around until desired size (inc. by 3 at each curve)
 
Pupils of the eyes:
Black Yarn
Magic Ring, 6 SC in ring, sl st to first SC, finsih off
 
Braids
Light green yarn
Dark green yarn
You will need 5 dark green, 4 light green cut at arms length for each side. Follow the instructions on how to attach from the above hat pattern.
 
Position and sew pieces onto the hat.


Baby Owl Hat


I love this pattern! My mom had a baby shower to go to and the couple was doing an owl theme in the baby's room so she asked me to make this for her to give as a gift.  Turns out a few others had the same idea (colors and all) and they ended up with 2-3 of the same or very similar hats :)

This is another one that would be super cute for a baby girl or baby boy, or matching sibling hats, the color combinations are endless for this adorable hat.  I really like the earflaps, they seem to make the hats more functional especially for the older babies/toddlers.  Without the earflaps I swear my sons ears are always hanging out and getting cold. 

The pattern I used can be found at this wonderful blog: Owl Hat Pattern

Baby Ballet Slippers


I absolutely LOVE these little slippers.  This was the project that really got me going on my crocheting.  My mom found a picture of these adorable little slippers, which immediately sent me on a search for a pattern.  I have tried several patterns for booties/slippers since then but I keep coming back to this one it's pretty straight forward and simple.  How could you not become addicted to making more after making somethign so freaking adorable.  (So began the search of many new patterns to try and the addiction to crocheting was born.) 

These would be cute with or without the ribbon, the ribbon is supposed to wrap around their leg like a real ballet slipper would.  I have also used this pattern with different colors and made a bow instead of a flower (will feature in future post).  This simple pattern can be used in many different variations.

I never did find an actual written out pattern but here is a link to the video I used:
Crochet Baby Ballet Slippers: Part 1
Crochet Baby Ballet Slippers: Part 2

Monster Hat


This was the first hat I made that had several pieces and I love it. Because it was one of my first hats I was still unsure of how to make it the right size so it ended up being a little big for Kyler, but should fit him by next year.  This reminds me a little of the monster on Monster's Inc.  Super cute, fun, friendly little monster is a for sure hit with the youngsters.  Would be adorable in girl colors, could be cute for siblings to have matching monster hats :)
 
I got this pattern from the following link: Monster Hat Crochet Pattern
 
The only thing I changed was instead of using felt for the teeth I used the white yarn I already had and made little triangles and attached them.  Personally I like the fuller look of the crocheted teeth versus the felt pieces shown on the website.  Either way it's a super cute pattern!


Baby Girl Hat


Here's one of the first hats I did a few months back, must have been January I believe I did it for baby girl right after finding out we were having a girl.  I love this pattern it's very simple but super cute and has a good stretch to it. 

The pattern I used can be found at the following link: Baby Girl Hat (Puff Stitch)

You can use the pattern found on the webiste or you can use my flower pattern, found here.

Introducing Sew Adorable

Hi everyone, I have decided to keep track of my projects and allow you all to follow what I've been doing through a blog.  I will post pictures of my most recent creations along with the pattern when available.  If you ever see anything I've done that you are interested in purchasing, you can special order in any color and generally any size.  If there is something you have in mind that you have not seen me do yet and would like me to let me know.  Due ot the interest I've had so far I decided I would make a small business taking special orders and attending a few craft shows each year, so welcome to this new business endeavor, Sew Adorable.

To order you can contact me via Facebook (Heidi L. Pomeroy Bush) or email me and heidi.lynne.b@gmail.com  Look forward to hearing from everyone. 

Let me take a moment and introduce myself, I am married and have a wonderful husband (Kurt) and son (Kyler).  We also have a precious little girl (Kaia) on the way.  She will make her appearance sometime end of May.  Up until this year I was a K-12 music teacher in a small town in Montana.  After my son was born I taught for another year and decided I really wanted to be a stay at home mom.  It was the hardest decision I have ever made because I love my students and loved my job but raising my family is very important to me.  My husband made lots of sacrifices living where we did when it came to his career so we decided it was time for him to jumpstart his career and moved to Nebraska close to Omaha and close to my parents.  It has taken about 6 months but Kurt has found what I think will be his dream job!  He is pretty amazing and impresses people everywhere he goes.  He applied and interviewed for this job and only knew about half of the information they questioned him on and although they had more qualified applicants they hired Kurt because they liked him and wanted to train him.  God has truly blessed us in our journey as a family, and I am so excited to see where God is taking us on this new journey. 

Since moving here this stay at home mom decided a hobby was a must.  I started making hats and booties and things for my kids and as I posted pictures got a positive reaction.  I have done several orders for people and am also going to do a craft show with my crocheted items and flannel blankets I've been making.  My crocheting and sewing has been a great outlet since staying home.  I hope you enjoy this blog.